It's life Jim, but not as we know it

2016-12-22

Create your own media center (with movies, BBC and ITV) in under 15 minutes

Kodi (formerly XMBC) is a free, cross platform media player that supports remote control over HDMI, HTTP (so any device your network) and has plug-ins for the BBC and ITV.
I had everything up and running in less than 15 minutes. I am able to watch movies, BBC and ITV all from one single interface.


media player interface


Additionally I can control the movies using the TV remote and I can use my phone to control the
content for movies or UK TV.  And best of all, I don't need to use iTunes anymore and I'm not flooding the network streaming movies to the Apple TV.

Here are the steps:

Preparation

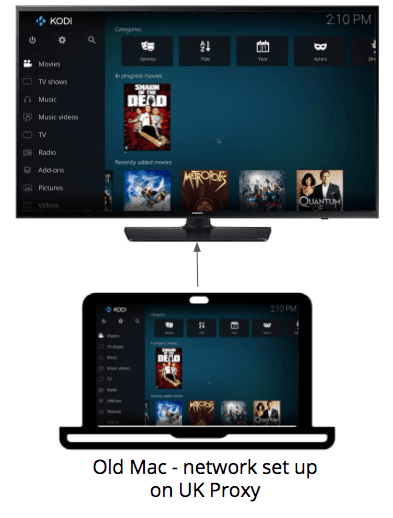
  1. Old Mac (or PC or Raspberry Pi) with an active Ethernet/WIFI network connection (must have internet access)
  2. HDMI out (you could use a VGA or DVI adapter if you're Mac is really old - but you will need to use your Audio Out cable). Make sure your audio is set to play on HDMI and not the Mac's internal speaker. (To do this go to System Preferences->Sound->Output on your Mac and select HDMI).
  3. Ensure all your movies are in one easy to find location on the Mac hard drive or an external USB drive (or networked location).

Install and set up Kodi

Install the Mac OS X build of Kodi from here: https://kodi.tv/download/ . While this post is focussed on the Mac, you should find a build for your OS (including Raspberry Pi, iOs and Android).

Once installed and running, Kodi will ask you to set up your movies (or music). If you were not asked for this information or you choose to do this at another time ...

just click the System Icon 

Kodi settings


then select Media Settings

media settings


then Library, then Videos


then click Browse in the Add video source section


and finally the location of your movie files.


Kodi will scan the folder and import all your movie files. It will also reconcile the movie information with IMDB to provide movie artwork, genre and synopsis information.

Remote control set up

We need to configure Kodi to accept remote control commands over the network and from a TV remote.

Go to System then Service Settings.


Go to Control

Click 'Allow remote control via HTTP' to enable it.  You should change the username and password.

Click 'Allow remote control from applications on other systems' to enable it


Go to UPnP/DLNA

Click to enable 'Share my libraries'

Click to enable 'Allow remote control via UPnP'


Use a TV Remote control

If you have a newish TV, it is likely to support HDMI Consumer Electronics Control (HDMI CEC). One feature of HDMI CEC is the ability to control Kodi using a TV remote control. The TV manufacturers choose to call HDMI CEC something different on their TV's but you can find your TV HDMI CEC brand here: http://bit.ly/2i319Fr.
Once you find the name, look in your TV's system settings to Enable HDMI CEC. For example on my Samsung it's called AnyNet+ and is enabled by default in the System menu.

With HDMI CEC Enabled, bring up your regular TV menu with the remote control and select the Input source menu. You should see Kodi listed. Select Kodi with your remote control. Now you will see a series of folders (music, movies) that you can navigate to. Once you get to the actual content you will see all your movies. You can play, pause, stop, fast forward,your movies from your remote. It's not bad but doesn't look as cool as your Android TV or Apple TV interface. Let's fix that ...


Use your Android phone

Install the free Yatse app from the Google Play store - located here: http://bit.ly/2htAy3n
Once you run the application it will search for Kodi. As long as your mobile device is running on the same network, the app should find Kodi and you will be able to control your media from your mobile phone.

Use your iPhone

There's quite a few Kodi remote apps on the Apple Store. I tried the "Official Kodi Remote" app located here: http://apple.co/2hcljya. Just as the Android app, the app will find the Kodi server instance if you are on the same network as the Kodi server.

Add BBC support

Adding support for the BBC is rally simple. Note: you must be in the UK to view BBC TV content (or at least set your Mac up to work on a UK proxy).

In the menu panel scroll down to Add-ons and then select Search


In the search box enter 'iPlayer WWW'


Select and Install the BBC iPlayer Add on.


Once installed, you can access the BBC content by selecting 'Add Ons' then the iPlayer Add on


The rest is pretty straight forward ..


If you look on your mobile device, you can access the same BBC Content using the Add-ons menu.


Add ITV support


Adding ITV support is a little more involved. I used MJD's blog post to do it - but I'm posting the steps here as well. If you want the concise version, just read this: http://bit.ly/2hVNVKE. (Warning: The steps have changed just a little due to the updated user interface - so my instructions are for the latest build of Kodi).


The first thing we need to do is enable installation of Add-ons from Unknown sources. To do this go to System then System Settings and select Add-ons and enable Unknown Sources


Once enabled, we need to add a new zipfile that will provide the new repository details.
Go to System then open File Manager  and select Add source


Select <None> and then Browse


Enter the following EXACTLY http://xunitytalk.me/xfinity and select OK


Type xfinity in the box underneath"Enter a name for this media Source". Select OK


Go back to the Home Screen. Select System-> Add-Ons->Install from Repository


Select the '..' option (ignore the other two items listed) and then select 'Install from zip file'


Select xfinity


Select XunityTalk_Repository


Wait for Add-on enabled notification


Now select Install from repository


Select .XunityTalk Repository


Select Video add-ons from the list. Then select ITV.


Select Install and wait for the Add-on enabled notification and return to the main menu.


To watch ITV content, just select Add-ons from the main menu and then ITV.


That's it - you're all sorted. Enjoy !!


2016-11-22

Create an Alexa Skill for your Amazon Alexa or Echo Dot

So you've bought an Alexa Dot and you want to create your own voice app - but you are wondering how difficult is it to build, how do you build the app and how much will it cost to run?  If you have basic programming skills then building the application is really easy. If you have written a function or script in Microsoft Excel or Google Sheets - then you can build an Alexa voice app. I'm providing all the basic stuff you need to get started ...

Note: This post is not intended to give you an exhaustive guide to building a skill. Instead it aims to give you the overview to get up and running quickly. Amazon provides a build-it-yourself walkthrough (here), samples (here) and a free course on Udemy (here).  I recommend starting with the free course then following the walkthrough.

How much does it cost ?

It costs nothing to build and run a simple Alexa app. $0 / £0 / €0.  Zero.  Furthermore the app is hosted on Amazon's cloud, it's secure, load balanced and managed for you - so don't need to provide your own hardware. The only real cost is your personal time to build the app.
If you use additional AWS services then you will incur costs - but for an initial app, demo or concept - you are unlikely to have to pay for anything.

What is an Alexa app?

The simplest Alexa app consists of 4 components
  1. Skill
  2. Intent & Slots
  3. Sample Utterance
  4. Application Logic (written in JavaScript or Python or your own code exposed via a service)


How the pieces work together


So before you get started, here's how your voice request gets translated and processed. I think it's useful to understand the flow and therefore triage any issues when you test the app. A word of warning here: this is my simple interpretation of the flow based on the apps I've built so far.


Let's assume our skill is called "Check In".  To invoke your skill and test it on your Alexa Dot, your Alexa Dot needs to be registered to your Amazon account (this is usually the case because most people tend to sign up for AWS using the same Amazon account that they used to purchase the Dot in the first place).

Asking Alexa to use your skill is as simple as saying "Alexa begin Check In" ...

How to build a skill

If you don't have an AWS account then sign up for one at https://aws.amazon.com/free/


To build your skill you will use two tools:
  • Alexa Skills Developer portal - create the Skill, Intent, Slots and Sample Utterance
  • AWS Lambda console  -  create the logic your app uses. AWS Lambda is a separate service that can be used with many other Amazon products. Lambda supports JavaScript or Python.

Important Note:
Your skill is associated with the lambda function using the Amazon Resource Name (ARN) of the lambda function.  When you create your lambda function, you will see the ARN at the top right of the screen. I mention this now because this is one of those bits of information that you need when you set up your Skill and you waste a ton of time looking for it later ...

Screen shot of Amazon Lambda with the ARN value highlighted
Lambda function with ARN


Your first Skill


We will create a simple skill that greets guests and asks them to announce who they are and who they are going to meet. It's a simple example and stops short of doing anything with the data collected. All of the code is available on Github: https://github.com/dipockdas/alexaskill. While it is simple, you could use this skill in a lobby for a business or even a guest comment book.

Step 1: Create your lambda function


I recommend setting up your back end code first as the Skill set up itself is pretty straight forward. Click this link to create your Lambda function: https://goo.gl/Nu3z3s

From the list of templates, select Blank Function.


On the Configure Triggers screen select 'Alexa Skills Kit'.


Click Next


On the Configure function screen enter the name of your function and select Node.js as the runtime.


Copy the JavaScript code located here http://bit.ly/2geg5Cy and paste it in the code window


Make a note of the ARN number at the top right of the window. Note: We will need to update one line of code later - so keep this browser tab open.

Step 2: Create your Skill

Open a new browser tab and create your first skill by clicking this link: https://goo.gl/TuEIvx
(Note: if the link does not take you to the create skill window - click Login, then click 'Get Started' on Alexa Skills kit, then click Add a new skill).

The skill type should be custom. You can give the skill any name you wish but call the invocation name "check in" or something that makes sense to a guest.


Before we proceed we need to update our application logic so that it only accepts requests from our skill.
Copy the Application ID from your new Skill - it's the string beginning with "amzn1.ask.skill".
Now go back to your Lambda function and update Line 11 of the code. Replace the string "***** CHANGE-ME ******" with your Application ID.

if (event.session.application.applicationId !== "***** CHANGE-ME ******")

Will now look something like ...

if (event.session.application.applicationId !== "amzn1.ask.skill.32222-3333-2222-3333")


Go back to your Amazon Skill browser tab.

Now you need to add the Intent to the interaction model.  To save time you can just copy the intent.json file from http://bit.ly/2giAmV1


The intent file describes the actions that your skill will support. If you scroll through the Intent schema you will see that there are 4 Intents supported - 3 built in Amazon intents and our custom intent.

  • Notify - our custom Intent
  • AMAZON.CancelIntent
  • AMAZON.HelpIntent
  • AMAZON.StopIntent

(To understand what each Intent does you can read the code you posted in your Lambda function).

Looking at the Notify Intent you can see that we have defined two slots. One for the Contact name (the person we are going to meet) and the other for the Visitor name.  Both of these will be passed to our Lambda function that we created earlier. You will observe that Visitor is defined as "AMAZON.LITERAL" - this allows us to capture any information and pass it onto our function to manage. Contact on the other hand has been defined as "EMPLOYEE". I could have defined Contact as "AMAZON.LITERAL" - because in all likelihood we would want to look up the contact in a directory - which we would do in our Lambda function. However, to keep things really simple, I chose to create a brand new type called "EMPLOYEE" - which will hold the lookup list of people that people could visit.

Click 'Add Slot Type'. Enter 'EMPLOYEE' as the name of the type and then enter a list of names in the values list.


Click Save when you have finished.

Now you need to add the Sample Utterances. Copy the text file located here : https://goo.gl/BGX8Vw 
and paste it in the Sample Utterances panel.


Last Step ... almost there ...


Now we need to connect your Skill to your Lambda function. Go back to your Lambda browser tab. Copy the ARN from the upper right of the screen.

Screen shot of Amazon Lambda with the ARN value highlighted


Back on the Skills tab,  paste the ARN into the Endpoint field on the Configuration window. I've assumed that your Lambda function and your skill is located in North America (if you have everything deployed in another region then of course switch to that region).


Once you have added the ARN - you can click the Test link and verify that the Skill is Enabled so that you can test it.


All done ! Let's Test !


You can now test the skill in the browser - but where's the fun in that? Let's get straight to Alexa instead !

With your Alexa device close by, Invoke your skill by saying "Alexa, begin Check In" .... and you're off to the races ! You have now built a voice driven application.

Checking the logs

Go to Cloudwatch located here https://goo.gl/kyu9Yn, and click on the link for your lambda function. If you click onto the latest timestamp for your function you will see all your console.log() messages (from your Lambda function) visible - including the parsed Contact and Vistor information.


Have fun !


2016-11-18

The easiest VPN set up ever ... (or how to surf anonymously and securely)

There are many reasons why you want to get online and surf incognito using a VPN.   Fortunately there is a really easy way to do this in 3 simple steps ...

Setup


1. Install the Opera browser from www.opera.com.

Opera is built on Google Chrome (so it's got bleeding edge support for all the web standards) AND it has a private browsing option with built in VPN support ...


2.  Once Installed, open the browser and Click File ... New Private Window


3. Enable VPN by clicking "VPN" next to the search icon in the browser address bar.


That's it - You're all set ! You can now surf anonymously !


Bonus Points...


You don't have to do this - but you can select the region from the Virtual Location drop down...
Why would you want to do this? Perhaps the site you want to access is region locked or you want to test your application experience for users coming from another region for performance and usability.

For example, as I was writing this post, Google popped up this friendly message....


I was curious to see what a user from Germany would see when they visited the site.
Do they see the Cookie alert required by the European Union? How do you test this?

4. With the VPN option enabled, click the 'Virtual Location' drop down


... and select the region.


Now navigate to your site ...


Now you are accessing your site via a server in the region you selected. In my case I selected Germany - Oh - and here's the cookie alert ....