I had everything up and running in less than 15 minutes. I am able to watch movies, BBC and ITV all from one single interface.

Additionally I can control the movies using the TV remote and I can use my phone to control the
content for movies or UK TV. And best of all, I don't need to use iTunes anymore and I'm not flooding the network streaming movies to the Apple TV.
Here are the steps:
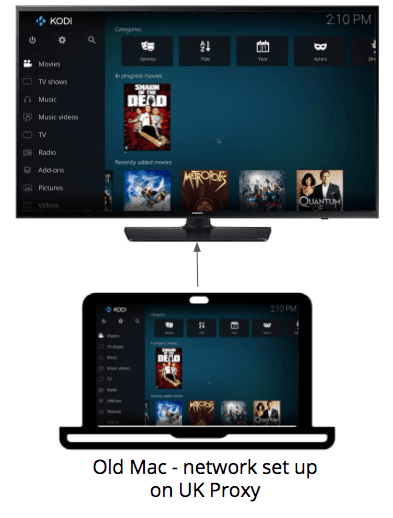
Preparation
- Old Mac (or PC or Raspberry Pi) with an active Ethernet/WIFI network connection (must have internet access)
- HDMI out (you could use a VGA or DVI adapter if you're Mac is really old - but you will need to use your Audio Out cable). Make sure your audio is set to play on HDMI and not the Mac's internal speaker. (To do this go to System Preferences->Sound->Output on your Mac and select HDMI).
- Ensure all your movies are in one easy to find location on the Mac hard drive or an external USB drive (or networked location).
Install and set up Kodi
Install the Mac OS X build of Kodi from here: https://kodi.tv/download/ . While this post is focussed on the Mac, you should find a build for your OS (including Raspberry Pi, iOs and Android).
Once installed and running, Kodi will ask you to set up your movies (or music). If you were not asked for this information or you choose to do this at another time ...
just click the System Icon

then select Media Settings

then Library, then Videos

then click Browse in the Add video source section

and finally the location of your movie files.

Kodi will scan the folder and import all your movie files. It will also reconcile the movie information with IMDB to provide movie artwork, genre and synopsis information.
Remote control set up
We need to configure Kodi to accept remote control commands over the network and from a TV remote.Go to System then Service Settings.

Go to Control
Click 'Allow remote control via HTTP' to enable it. You should change the username and password.
Click 'Allow remote control from applications on other systems' to enable it

Go to UPnP/DLNA
Click to enable 'Share my libraries'
Click to enable 'Allow remote control via UPnP'

Use a TV Remote control
If you have a newish TV, it is likely to support HDMI Consumer Electronics Control (HDMI CEC). One feature of HDMI CEC is the ability to control Kodi using a TV remote control. The TV manufacturers choose to call HDMI CEC something different on their TV's but you can find your TV HDMI CEC brand here: http://bit.ly/2i319Fr.Once you find the name, look in your TV's system settings to Enable HDMI CEC. For example on my Samsung it's called AnyNet+ and is enabled by default in the System menu.
With HDMI CEC Enabled, bring up your regular TV menu with the remote control and select the Input source menu. You should see Kodi listed. Select Kodi with your remote control. Now you will see a series of folders (music, movies) that you can navigate to. Once you get to the actual content you will see all your movies. You can play, pause, stop, fast forward,your movies from your remote. It's not bad but doesn't look as cool as your Android TV or Apple TV interface. Let's fix that ...
 Use your Android phone
Install the free Yatse app from the Google Play store - located here: http://bit.ly/2htAy3n
Once you run the application it will search for Kodi. As long as your mobile device is running on the same network, the app should find Kodi and you will be able to control your media from your mobile phone.
Use your iPhone
There's quite a few Kodi remote apps on the Apple Store. I tried the "Official Kodi Remote" app located here: http://apple.co/2hcljya. Just as the Android app, the app will find the Kodi server instance if you are on the same network as the Kodi server.
Add BBC support
Adding support for the BBC is rally simple. Note: you must be in the UK to view BBC TV content (or at least set your Mac up to work on a UK proxy).In the menu panel scroll down to Add-ons and then select Search

In the search box enter 'iPlayer WWW'


Once installed, you can access the BBC content by selecting 'Add Ons' then the iPlayer Add on

The rest is pretty straight forward ..

If you look on your mobile device, you can access the same BBC Content using the Add-ons menu.

Add ITV support
Adding ITV support is a little more involved. I used MJD's blog post to do it - but I'm posting the steps here as well. If you want the concise version, just read this: http://bit.ly/2hVNVKE. (Warning: The steps have changed just a little due to the updated user interface - so my instructions are for the latest build of Kodi).
The first thing we need to do is enable installation of Add-ons from Unknown sources. To do this go to System then System Settings and select Add-ons and enable Unknown Sources

Once enabled, we need to add a new zipfile that will provide the new repository details.
Go to System then open File Manager and select Add source

Select <None> and then Browse

Enter the following EXACTLY http://xunitytalk.me/xfinity and select OK

Type xfinity in the box underneath"Enter a name for this media Source". Select OK

Go back to the Home Screen. Select System-> Add-Ons->Install from Repository

Select the '..' option (ignore the other two items listed) and then select 'Install from zip file'

Select xfinity

Select XunityTalk_Repository

Wait for Add-on enabled notification

Now select Install from repository

Select .XunityTalk Repository

Select Video add-ons from the list. Then select ITV.

Select Install and wait for the Add-on enabled notification and return to the main menu.

To watch ITV content, just select Add-ons from the main menu and then ITV.

That's it - you're all sorted. Enjoy !!